As it turns out, I’m not much of a blogger, unless “much of a blogger” means someone who posts once every three years or so. But I found myself with a few minutes on my hand, and thought I’d summarize some tricks and tips I’ve found particularly useful over the last few years. Nothing revolutionary, but stuff it’s nice to be reminded of. Here goes, in no particular order.
1. Low-passing drums in vocal-centric tunes. Kind of obvious, I guess. But it is interesting how much you can get away with in terms of leaving out top frequencies in the entire drum kit if you have a strong vocal presence in the song. The more subtle, and more common, method is of course to focus on the particular drum instruments that may interfere with the vocals, like cymbals, hi-hat or a snappy snare. But I’ve found that in certain situations you can actually low-pass the entire drum kit (with a gentle slope) as low as 6khz. That certainly leaves a lot of room for the vocals to breathe!
2. Wobbly tape instead of chorus. Chorus is tricky in the digital domain. If you have a rush job and don’t have time to hook up your finest analog chorus, or you simply don’t have one, it can be difficult to find a good chorus plugin. There are a few, but here’s an alternative trick: Use a tape emulation plugin. Send your signal to a bus with a hi-pass filter and a slightly delayed and very wobbly tape emulation on it, and let it shimmer vaguely behind the original signal. More often than not this gives a more organic kind of movement to the sound than a digital chorus plugin.
3. Saving anemic drums in a stereo mix. Since I master a lot, I have to have strategies for a lot of scenarios involving stereo mixes. A common problem is that the drums don’t pack enough punch. Many inexperienced mixers mix the drums too low before mastering, not knowing that the mastering process may push the drums even further back in the mix. Usually the opposite is better: Mix the drums just a little louder than you think sounds right. They’ll end up JUST right after mastering. But, if that hasn’t been done, here’s a trick I usually use: Multiband compression. Bypass all but the lowest band, maybe active up to about 200hz. Lower the threshold to where you can tell it starts pumping the drums up a bit, but be careful, too much and you get a bloated bass. Another trick can be to use an enveloper to enhance drum transients in the relevant frequency areas.
4. Drumming in the car. OK, a weird one, but I’ve found that the combination of a car’s unique acoustic environment (pretty darn dead) and the materials they use in car interiors, make for a great palette of percussion sounds. Bring your drumsticks, or any old stick, into the car along with a decent mic, maybe plugged into your iPhone – and drum away. I mostly just hit anything I can see and then bring the recordings to the computer afterwards to sample and treat the sounds. Almost without exception these sounds are gorgeous and work great in a mix.
5. Trackspacer. Not a trick, but a tool. Trackspacer is a plugin I’ve been waiting for my whole life, or so it seems, and it does exactly what it should do. It’s basically a dynamic eq that ducks certain frequencies based on an incoming signal through a sidechain. I don’t think there’s hardly a mix I do these days where I don’t duck a bit of the bass guitar via the kick signal, or take a bit of bite out of the guitars to make space for the vocals. Such a time-saver. https://www.wavesfactory.com/audio-plugins/trackspacer/
6. Bonham through pre-delay. Another obvious one, but a technique I’ve had more use for lately, for various reasons. You know that slapback-y John Bonham sound? You have a drum recording that’s kinda dry and uninspiring, and you want some of that spacious Bonham mojo. Some folks use an actual slapback delay to achieve that, but I find that the result is sometimes a bit messy. Try a relatively dense room or chamber setting on the reverb instead, and pre-delay the signal quite drastically, to where it starts working with the beat. Obviously, you’re also going to compress the heck out of that reverb. Voila.
7. Drums that live and breathe. Maybe it’s because I’m becoming an old geezer. I get tired of the squeaky-clean sound of most modern radio fodder. So I do what I can to subvert that when I do mixes. One of the things I do – or rather don’t do – more and more often, is excessive drum editing. It’s de rigeur for most editors/mixers to cut out a lot of the drum signal – snipping out all the “empty” space between tom hits, for instance, or manually or automatically gating the kick drum. Whenever I can these days, I skip those procedures. If the drums are decently recorded, without excessive leakage between the parts of the kit, I actually love the alive sound of the drum kit coming through every microphone all the time, interacting and creating a real ambience. Try it.
8. Mute, mute, mute! Another thing I find myself doing increasingly, is muting tracks. What the heck to I need 10 tracks of the same guitar riff for? And why does the acoustic guitar double the electric guitar, and the synth double the piano? It’s a waste of sonic real estate, and the super-layered sound gets fatiguing on the ear after a while. Let instruments stand alone. Give them space. And focus on instrument parts that complement each other, rather than doubling each other.
9. Bricasti for the broke. Not sure these exist officially anymore, but the interwebs usually provide some way of finding these things: At one point a company called Samplicity issued a collection of impulse responses from a Bricasti M7 reverb unit. These sound absolutely amazing and can be easily loaded into a generic DAW impulse reverb like Logic Pro’s Space Designer. Suddenly you have the world’s creamiest – and priciest – reverb unit at your disposal. There’s literally hundreds of impulses in the collection, and I’ve been using these for probably 10 years – they still sound fresh.
10. When in doubt, use a pedal. Plugins are nice and practical, and expensive outboard equipment is awesome. But if you’re looking for a particular sound or effect, and your plugins just don’t seem to hit the spot, and you don’t have fancy-schmancy Eventides or Distressors or whatever in your rack: Use a cheap stomp-box. It gives so much more character to the sound than a plugin, and the real-time tweakability of a pedal makes it quick and easy to find the right sound. Added bonus: Stomp boxes are often mono, so you automatically get more space in your mix.
Every sound worker has a few favorite tools that they use over and over again, because they just get the job done. Some like to keep it a secret, some are happy to share.
Here’s a quick list of software tools I couldn’t do without, and that you’ll be happy to discover if you haven’t already:
If you’re working on a tight schedule and you’re handed a mix project or maybe tracks to master that just sound, you know, harsh and unpleasant – what do you do? It can be hard to locate a single source of that harshness if the recording is just generally badly done. Cheap microphones, cheap audio interfaces, bad mic placement, bad instruments, all play into this, and suddenly the bad frequencies pile up. Preferably you want to go through each and every track and polish away with eq and add some analog warmth. But sometimes you just don’t have the time. Enter Soothe, which is an interesting tool – basically a dynamic eq or a frequency-specific compressor, whichever way you want to look at it. Let’s call it a de-esser for all purposes. This is a fantastic plugin for taming harsh cymbal noise, removing digital fizz from DI’d guitars, attenuating sibiliance on entire vocal arrangements or any number of other things. It’s fairly transparent, and can be easily tweaked to address just the problem area and nothing else. Don’t leave home without it.
They call it a “harmonic processor”, and it’s basically a harmonic distortion unit. It’s one of those magic bullet things that does something a bit intangible, but it just makes things sound great – especially more rockin’ material. I wouldn’t recommend this on delicate folk music. But with 4 cryptically named controls (Salt, Pepper, Sugar, Chili) you can add both amount, type and intensity of harmonic distortion to enhance any sound. This excels at adding thickness and weight to sounds, and especially on a master strip it can bring a whole arrangement to life by adding a bit of texture and musical grain to a tune. I can’t really give advice on how to use it, I’m not even entirely clear on which control does exactly what, but you can tweak forth awesome sounds in no time. It also has some M/S encoding that enables you to manipulate the stereo image as well.
Anyone who works with virtual amps knows that simulated bass amps pretty much always sound like crap. Either they’re anemic and thin, or they have some sort of monstrous, out of control bass frequency response. It’s very, very difficult to find plugin bass amps that sound natural and that sit well in a mix. I don’t know why exactly, it just is that way. Which is why I was so relieved to find the Eden amp from Softube. Modelled on the classic Eden “World Tour” amp that has been used by Genesis’ Mike Rutherford and Phish’s Mike Gordon among many others, the Softube Eden sounds warm, realistic, full and very controlled. You can tweak to your heart’s desire, but even just dropping a preset into the mix will sound good. It’s got great eq, bi-amping options and a very good compressor, and it really excels at those hi-fi, deep but unobtrusive bass sounds that can be so hard to achieve. But it’s also great for rippin’ rock bass. As software bass amp options go, this is by far the best in my book and I wish I’d found it sooner.
Another thing that’s tricky to find good emulations of, is plate reverb. There’s plenty of decent ones, and a few good ones, but they tend to be expensive. Little Plate is affordable and awesome. It’s one of those reverbs you can throw absolutely anything at – it’s great on vocals, on drums, and fantastic on guitar. It’s never overpowering and you don’t have to spend time eq-ing the reverb because it always seems to occupy the right frequency space right out of the box. Modelled on the legendary EMT 140, this oozes vintage charm and class and gives that warm aura around a sound without obscuring the source. The layout is simple, the controls few – it just does what you need it to.
I’ve already recommended a couple of Stillwell’s excellent plugins on this blog. They’re oldies but goldies. Bad Buss Mojo is hard to describe – it’s a saturator, a compressor, a tube/transistor simulator. All I know is that if you have an instrument – or even a track – that just sounds too nice, to bland, a little boring: Slap on the Bad Buss and let it work its Mojo. Tweak the controls every which way and you’ll see that this plugin goes from mild, pleasant saturation to downright outlandish results. But I like it best for treating DI’d guitar, to give it that weight, that sense of reality and presence that you often lose when DI-ing instruments. Even on a clean guitar the Bad Buss is absolutely magical for bringing the sound to life, thickening it, and pushing it out of the speaker. Try it.
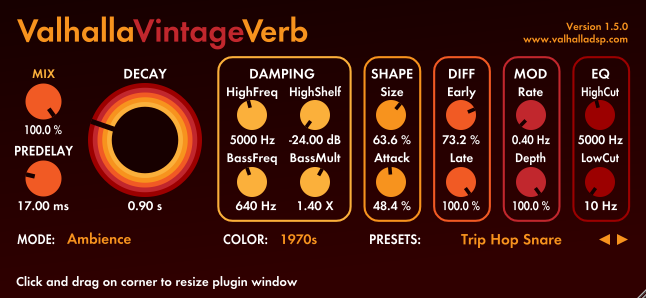
VintageVerb might not be much of a secret these days, but if you don’t have it, you must get it. It’s the mother of all reverbs, and especially if you – like me – love 80s digital reverbs of the Lexicon variety, this is priceless. You can get incredibly lush, luxurious and shimmering vocal reverbs for instance, that somehow manage to not eat up the frequency space of the mix – a rare and treasured trick. You can choose between 70s, 80s and contemporary flavours of reverb, and it offers both spaces, from rooms to cathedrals as well as classical Lexicon digiverbs and plate reverbs, great gated reverbs and psychedelic modulated reverbs. Reverbs is another one of those things that is often still better in old-school standalone processors than as plugins, but this one is a clear exception to the rule.
So, something a bit more specific this time. If you’re like me, you’ll sometimes face a situation where you are asked to mix a tune where some of the elements are already mixed, or rather, “mixed”. Typically you might be given a stereo mixdown of the drums with no access to the original files. Or you might simply be trying to work a drum loop into the mix. In either case, more often than not that stereo file will be lacking in some respect or others. I have a couple of quick fixes that I wanted to share. Cheap tricks for sure, but sometimes that’s all you need.
If the snare sounds like crap, or it’s too low in the mix, here’s what I’ll often do: Send the stereo drum mix to a separate bus where I use a parametric eq to filter out all but the meat and bone of the snare sound. Then I’ll put a noise gate on that, so that only the actual snare hit triggers its way through. It’s important to not leave too much bottom end in the filtering, because otherwise the kick will sneak through the gating too. Now you have a bus that just issues a sort of noisy burst with every snare hit. You can do with that what you will basically, but the idea is to mix that back in with the whole kit. You could compress the hell out of this “snare” bus, maybe distort or saturate it, and elongate that sound with a reverb or delay. Then gently tuck the sound from your “snare” bus under the whole kit until you hear that you get some fizz and life and presence out of the snare drum. Sometimes it can work wonders with something that separately just sounds like whiteish noise, but mixed in with the real kit it can give that airy tchhh to a snare that originally was mostly attack and singing.
With the kick it’s basically the same game, but this time just lowpassing the sound of the kick and gating it so that you just get the kick hits. You could use that signal to trigger a kick sample, or you could mess around with it with distortion or maybe pitching, and again mix it back in with the whole drumkit until you have a kick that stands out.
Sorry for my absence for a while, been busy with work and a studio and home relocation. But I finally have some downtime and I thought I would address an issue close to my heart, and close to the hearts of many, I know: Vocal tuning.
Now, I’m no luddite, and I love the new technologies offered to us sound freaks. Mostly, new recording technology makes it easier, cheaper and more pleasant to record and mix music. The auto-tune technology was created with this in mind: Why don’t we make a tool that takes some of the sweat out of the vocal recording process. As I wrote in an earlier post, recording vocals can be emotionally harrowing and sensitive. And as an engineer you’re often wishing for things like “if only the energy of that first take could be combined with the pitch perfect 5th take…”. Auto-tune solved that. If you had a take with the right feel and energy, but maybe in one or two places it wasn’t quite on pitch, you could fix it and get the best of both worlds. I get that, it’s a good thing.
But since then the auto-tune has been abused in so many different ways, and has become so ubiquitous in modern recording that you hardly ever hear a recording, at least within the mainstream of rock and pop, where the vocals aren’t pitched to 100% precision. To my ears that sounds completely, utterly, horribly wrong. The human voice is an incredibly complex instrument, with tones and overtones, wobbles, vibratos, whoops and whispers. A huge part of what makes a vocal performance compelling is the degree of expression and variation the singer puts into it. A good blues singer slides and slips in and out of those blue notes, a classically trained singer uses an endless array of vibrato techniques and a rock singer can include talking or screaming and other less pitch-sensitive elements in their performance. A good singer is someone who can stay on pitch, but who also understands pitch well enough to literally bend it to her/his advantage. Listen to Etta James, for instance:
And sometimes a healthy disrespect of pitch can actually add to the emotional impact of a performer – where would Leonard Cohen or Bob Dylan be in a world of auto-tune?
So my argument is that indiscriminate use of auto-tune pretty much kills vocal performances these days. Whenever I do hear a “real” vocal, it’s such a relief on my ears and on my soul. I don’t want to discourage folks from using pitch correction altogether, but I would advice you to use it only as a means to an end, and sparingly so. Was there a particular verse where the singer was so animated and so into it that she/he maybe forgot the pitch a bit? Do you doubt you’ll get that kind of energy out of another take? Then maybe it’s the right time for pitch correction. But if the issue instead is that the singer is actually out of tune for extended parts of the performance, you need a different approach.
If the singer is inexperienced and either simply doesn’t have a very good technique or gets nervous in front of the microphone, you can let her/him record in relatively short sections, maybe a line at a time, or a verse at a time. That way there’ll be more focus on that one part and a bigger chance of bagging it. Sometimes an inexperienced singer can also benefit from hearing her/his voice in the room, so maybe ask the singer to remove the headphones on one ear. Quite often that works just as magically as auto-tune!
In a more ragged, loose rock performance you’ll maybe need less of that attention to detail, in which case other methods can save a pitch-uncertain performance. Double tracking is an ancient tool of the trade and can really work wonders on a rock singer more concerned with feel than pitch. One wobbly performance can often be evened out with another wobbly performance, ironically. You’ll get a bit of a chorus effect, where the variances in pitch become a desirable effect rather than a nusiance. And why stop at two takes, it can be interesting to experiment with serious multi-tracking for a lead vocal. Double- and multi-tracking lead vocals worked for Ian Anderson, so why not for your singer?
Another trick I kind of like is best reserved for the really stripped down performance, say a folk arrangement or something like that. Let’s say we are again dealing with a performer who is more feel than musical precision. In a sparse, simple arrangement it can sound really beautiful to double the vocal melody with another instrument. It can be a piano, a violin, a guitar or maybe some tuned percussion instrument. When you do that, and the instrumental doubling of the vocal is clear and present in the mix, it can actually be quite cool to have a vocal that is neither particularly pitch-accurate or even right on the timing. If a nice-sounding instrument carries the melody, the vocal can be more of an interesting afterthought, maybe a sort of talky/whispery accompaniment to the melody.
Go forth and experiment, but for the gods’ sake, stop killing vocal performances with auto-tune!
PS: Don’t forget to check out my other posts, and to check out my studio at http://www.duderanchstudio.com – and remember – sharing is caring. Share my contents freely with people you think might be interested, and share content with me that you think I may be interested in.
Although ideally you want to do as little as possible with a recording after it’s done, chances are no matter how truthful the recording is, you still have some work to do. Part of the reason is that while a recording is supposed to reflect real life (that’s why we talk about fidelity), it is also something more than real life. Most successful recordings have a “larger than life” feel to them – in a way they are hyper-real rather than “just” real. Sounds are slightly hyped to be clearer, larger, stronger than if you just put a microphone in front of the musicians and released that recording without further ado.
Few areas of the mix are more critical when it comes to that final polish than the vocals. While you want the vocals to sound as natural as possible – as we talked about in the previous post – you also want them to sound polished and present and, again, slightly larger than life. This goes back to what I talked about before: The vocals are the main focal point of a rock or pop recording. It’s what the listener latches onto first, and it is what audiences relate most easily to. A majority of listeners do not play drums or guitars, but they all have voices that they use every day. Bottom line: Your vocals better sound good.
There is, however, a fine line between polished and artificial, which is something I’ll be addressing in this post. Excessive processing and uncritical use of pitch correction can really suck all the life out of a good vocal recording. When I talk about this, keep in mind that I work exclusively in genres other than teenybopper Top 40 material. Laser-guided, pitch perfect vocals are the way to go if you’re recording the next Justin Bieber or Selena Gomez. As much as I respect those two artists, I personally do not like that style of vocal mixing, and I will not take that kind of mixing philosophy into account here.
Equalizing vocals
I like to start with the EQ when I process vocals. Others start with compression. You’ll have your own workflow that you like. The first thing I do when I have a finished vocal recording, is to filter out the low rumbles – especially if no filter/pad was used during recording. Use a high-pass filter and sweep it upwards until you hear that you start losing body in the vocal sound. You don’t want to cut into the actual body of the sound. Find that spot, then pull the filter back down a bit. This varies both for individual singers and especially male and female voices. For a male vocal I’ll typically end up setting the high-pass filter to around 160 hz. Unless you’re mixing Nick Cave or Crash Test Dummies there’s rarely anything useful below that. Another factor is how busy the mix is: An uncluttered mix can handle more bottom end in the vocals, a busy mix will need a more cropped vocal. You have to experiment with the slope – the rate at which the frequencies are rolled off. I personally like a steep slope (24db/oct) when it comes to vocals, but some prefer a gentler slope, like 12db/oct.
Next you have to listen very closely to the vocals, maybe while cross referencing it with professional vocal recordings that you like. Is your recording open, clear, full? If you experience some kind of congestion in the sound, it’s wise to bring out your favorite parametric eq and try to sweep the frequency spectrum with a gentle cut, let’s say set to -3db and with a Q value of about 0.5, until you hear the sound opening up. Again, this depends on the voice, but I often find that congestions reside somewhere between 250hz and 400hz. Be very aware, however, that this is also where a lot of the body and warmth of the voice lies, so be careful and gentle when cutting – too much will leave you with a thin sound.
Conversely, if the vocal sounds too thin, you reverse this process, sweeping a boost of let’s say +3db across the spectrum to see if you can compensate for the lack of body somewhere along the spectrum.
When it comes to more surgical equalization, the same sweeping technique can be used, but with a much narrower Q value (I’d say anything from 3 and upwards) and a higher boost (as high as you want – this is just to detect problem frequencies). You do this if for instance you sense that there’s some harshness in the vocals. Sweep the narrow boost across the spectrum, and once your ears start bleeding you stop and you turn that boost into a cut. However, when you cut problem frequencies I would suggest opening up the Q value a bit again, to soften the cut, and to be wise about the amount of dbs you’re cutting. It can be tempting to cut a lot to completely remove that unpleasant frequency, but cutting too much will sound unnatural. And if you have a lot of deep cuts you can open a whole can of worms of related problems like combing effects, but that’s for another day. Moderation is the word.
Now for the more purely aesthetic eq sculpting. Hopefully you won’t need too much of it, since you have a good recording to work with. The main area where I feel vocal recordings often need a little help, is in the “presence” and “air” regions. An “expensive” vocal sound usually excels in these areas. But it is also a bit of a minefield, because boosting in these upper frequencies can cause harshness and excessive sibilance (more on that later). A recording that really gets that delicate balance right, even in a relatively dense and dynamic mix, is Adele’s “Set Fire to the Rain”:
That kind of vocal mix takes real expertise. The vocal always floats on top of the arrangement, always super-intelligible but also always pleasant on the ear. And most importantly, the vocal has a presence almost as if Adele was singing next to your ear. Not easy to pull off.
For this kind of eq I would ditch the parametric eq and switch to a more old-fashioned, analog style eq. I personally have the Neve 1073 as my go-to vocal eq. It has some magical properties (actually not magic, just good engineering, but to me it works like magic) that lets you add considerable amounts of presence and air without getting a harsh sound. It can really open up a vocal in an astonishing way, almost like stripping away layers of gauze from the sound. Your cheapest entry into the world of the 1073 is Stillwell Audio’s “1973”, which I still use pretty much every day even though I have much more expensive emulations in my library.
I find it hard to give advice on where to boost to achieve clarity, presence and air. It’s so individual to the voice, and also dependant on the overall tonal color of the arrangement. But very generally, you can find “air” somewhere between 10khz and 18khz, while what we generally perceive as presence resides in the 1-8khz area. Keep in mind though, that presence can also be helped by cutting in the “muddiness” area of 100-650hz.
Engineer Chris Huff has a good chart for important vocal frequencies that can be helpful here, so I’ll borrow it:
100 Hz – 300 Hz : Clarity / Thin (Good for cutting these frequencies)
100 Hz – 400 Hz : Thickness
100 Hz – 600 Hz : Body / Warmth
100 Hz – 700 Hz : Muddiness (Good for cutting)
400 Hz – 1,100 Hz : Honky / Nasal
900 Hz – 4,000 Hz : Intelligibility
1,000 Hz – 8,000 Hz : Presence (I told you the ranges could be wide)
1,500 Hz – 7,000 Hz : Sibilance (Start in the 3,000 to 5,000 Hz range)
2,000 Hz – 9,000 Hz : Clarity (Compared to the 100 to 300 range for cutting, this is good for boosting)
5,000 Hz – 15,000 Hz : Sparkle (who makes up these words!?!)
10,000 Hz – 20,000 Hz : Air / Breath-iness
Anyway, the bottom line is that with a vintage style EQ like the 1073 you can experiment and feel your way around the frequency spectrum to find those “magical” frequencies that can handle a bit of a boost. Accentuating the “air” or breathy aspects of the vocal can help give it a kind of weightless quality that lifts it above the arrangement, and it is also perceived by the ear as a very pleasant frequency range. A presence boost helps the vocals cut through the mix, and will also help place it in its own unique spot in the mix, bringing it “forwards” in the 3D illusion of the soundstage.
Another important frequency area to watch is what the chart above refers to as Intelligibility. Remember I talked about how important it is to hear the tonal content of the bass guitar? Same goes for the vocal. If all you hear is breathiness and edge, but little actual tonal meat, you need to boost this area, where the actual music of the vocal lies hidden.
Compression
I don’t intend to get into the nitty-gritty technicalities of compression, because it really is something you need to play around with to get the result that best fits your mix. I’m just going to mention a few things to keep in mind. The first is: Vocals pretty much always need compression. Maybe you’ve compressed a bit during recording – I’d still recommend applying careful compression in the mix. A vocal that fluctuates a lot in level is a tell-tale sign of an amateurish production. But how much you want to apply is a matter of taste and what the arrangement demands. A stripped down arrangement, let’s say one with mostly vocals and piano or guitar, can take a pretty dynamic vocal. Then you can set the compressor to a mild threshold and ratio where it mostly controls the extreme peaks of the vocal.
The denser the arrangement gets, the more you need to control the vocal to make sure it’s intelligible and holds its own against the rest of the instruments.
Compression is also an aesthetic choice. If you want a really “in your face” vocal sound, you can get quite heavy on the compression, whereas milder compression gives you a more natural and organic vocal sound. When it comes to the attack and release, the general advice is a quick attack time and a slower release time for smooth, continuous control, but this is also an area where only tweaking and experimenting will give you the answers you need.
For vocal compression I gravitate towards one of two compressors (although this is down to personal taste and not necessarily a universal recommendation): Either Waves’ time-honored Renaissance Vox, or a good 1176 emulation. For transparent and efficient compression, I’ll use the Vox. It just does the job, in the best possible way. But if I want character and vibe, I use Waves’ 1176. The 1176 adds something unique to a vocal, a tiny bit of grit that adds a natural presence and urgency that no eq can create. The harder you drive it, the more of that quality is brought out.
It’s probably getting boring hearing me talk about moderation, but unfortunately it applies here too. Dynamics are essential to a good vocal sound – the singer uses dynamics as an essential part of his or her expressive repertoir, and if you squeeze the vocals too hard you’re basically squeezing the expression out of it.
Sometimes, if you feel that you need to control the vocals quite a bit, it can be a good idea to use more than one compressor in the signal chain, and drive two or more compressors gently rather than throwing all the work at one compressor. It can give a smoother, more natural sound and still really nail the vocal if that’s what you’re looking for.
A final, very important thing to keep in mind if you find yourself reaching for the compressor more than you should, is that fluctuating levels can sometimes be more efficiently dealt with through volume automation. I’ll sometimes use automation to address all issues regarding dynamic control and intelligibility, and instead use the compressor very midly for more aesthetic/creative purposes.
Sibilance
Once you’ve added dashes of the famous “air” and brought out even more presence from the vocals with your compressor of choice, you might run into a little problem: Sibilance. Sibilance is when the s-es and related sounds end up sounding harsh and unpleasant. The more compression you apply, and the more you boost the upper frequencies, the more likely you are to get unpleasant sibilance. There’s two solutions for this problem (outside of the pre-mix measures you can take, like choosing the right microphone and coaching the singer in softening his/her sibilants while singing). One, and my least favorite, is the de-esser. The de-esser is basically a compressor that only works on a specific frequency area. The de-esser zeroes in on the “problem” frequencies and attenuates the level of these. A good de-esser can do a pretty good job if you take your time to set it up right, but it can be cumbersome. If you are not careful, you can end up with lisping s-es, which is one of the worst things I can hear in a vocal production. An alternative to de-essing is volume automation, which is what I pretty much always use. It is time-consuming and tedious, but the results are usually far superior to automatic de-essing. You simply bring up a volume curve on the track in question, and manually attenuate the level by drawing dips in the curve where the offending sounds are. You have to feel your way around what kind of “shapes” work best, but you’ll get the hang of it. It’s sometimes suprising how much you can attenuate a sibilant without actually affecting the perceived level when listening back.
Space is the place – reverb and delay
Although a completely dry vocal can sometimes work in a stripped down, folksy setting, most rock or pop mixes use some kind of spatial enhancement on the vocals, whether it’s reverberation, delay or both. This is another area where advice is almost pointless, because the singer’s voice, the mixer’s taste and the style of music and arrangement will all be deciding factors in the proper use of reverbs and delays.
A few pointers, though. In many low-rent mixes I hear very liberal doses of quite dense reverb on the voice. This can be cool if you’re going for an 80s gothy/dreamy kind of sound, but generally too much of a thick reverb will only serve to obscure the vocal by making it recede into the mix. It’s important to remember that reverb basically places the vocal along the front/back axis of the soundstage. More reverb tells the listener that the singer is far away, less tells the listener the singer is closer. There are few mixes where you want the singer to sound like he or she is in an adjoining room or shouting out in the woods…
So, judicious and carefully applied amounts of reverb is the way to go. A critical factor is not letting the reverb overpower the actual vocal. Firstful, don’t put the reverb on the actual vocal track. Send the vocal to a dedicated effects channel where you set up a vocal reverb 100% wet. Then you can decide how much of the original vocal signal to you want to send to the effects channel.
Second, choose the right kind of reverb. You’ve got your plate reverbs, your spring reverbs, your hall and room emulations and your typical 80s digital reverbs. Decide which you want. I tend to gravitate towards plate reverbs for vocals. They are usually subtle and unobtrusive and have a relatively soft sound to them. You’ll typically hear plate reverb on vocals in classic 70s and early 80s productions. If you want something with a longer tail and more of a spacious feel, an 80s style digital reverb can often be the way to go, because they are often pre-eqed to be transparent and not get in the way of the original signal.
Regardless, I’d always recommend eq-ing the reverb channel. A simple trick can simply be to put an eq on the channel strip ahead of the reverb to filter out whatever you don’t want in the reverb. The lows can usually be left out, they only muddy up the reverb, and the extreme highs can also safely be attenuated to ensure that especially sibilant sounds don’t “hang” in the reverb. Generally, the reverb should contain less frequency content than the original signal.
Another way of ensuring clarity and intelligibility when adding reverb to a vocal is using the pre-delay control. The pre-delay sets the amount of time between the original signal and the onset of the reverb. By increasing the pre-delay you basically put some distance between the vocal and its reverb, helping the actual words and notes stand out clearly while still allowing the reverberation to unfold in the signal’s wake.
A few more things to remember about the reverb: The amount of reverb and the length of the reverb tail needs to be adjusted according to the needs of the arrangement. A sparse arrangement has room for more generous reverbs, especially if the song is mid-tempo. A faster-paced, more densely packed arrangement will only be hindered by lingering reverbs, so here the key is to keep it short and sweet. The same goes for the amount of low frequencies in the reverb. The more packed the arrangement, the less room for reverberating low frequencies. Even the choice between stereo or mono reverb can be guided by this principle: A stereo reverb takes up more space, and is therefore more suited to spacious arrangements.
Sometimes using a delay instead of a reverb can be a good way of creating a sense of space and depth without clouding up the vocal sound too much. Delays can be used in a myriad of ways, from the typical 60s slapback variety heard on most Beatles albums, to rhythmically complex multitap delays. A delay is usually less dense than a reverb, because it consists of isolated “points” of sound rather than a whole blanket of it (although strictly speaking a reverb is really just a very dense shower of echoes, but we hear them as a continuous sound). As such it lets the other sounds through and feels lighter and more transparent. I often find myself reaching for the delay before I start out with reverbs in a song, because in my experience a vocal delay is easier to fit into the mix.
A slapback delay typically consists of just one repeat of the original signal, with a short delay time. The effect of this is basically to double the vocal, thickening it. In many ways it’s a “cheap” alternative to dubbing a vocal, but it can be surprisingly efficient in certain settings, and it can give a cool vintage feel to the vocal. The single-repeat slapback can be relatively prominent, tucked closely behind the original signal, volume-wise.
For a more expansive effect you can experiment with multiple repeats. If your DAW has a tape style delay, try setting it to 2-3 repeats, experiment with the delay time, and play around with the high and low cut filters. You might find that a relatively thin sound on the actual delays will sit nicely with the original signal, creating a ghostly “shadow” behind the vocal that is unobtrusive in the mix while creating a great sense of space. I often try to steer clear of tempo-synced delays, as I find the result is often more organic and natural. If you have a stereo delay it’s good to have rather different delay times on the left and right channels – maybe a very short one in one channel and a moderately long one in the other. Tweak until it sounds right. A stereo delay can be great for “widening” the vocal if you want a huge vocal sound.
A multi-tap delay “taps” delays from different points in a delay buffer – it’s all rather mathematical – but can create very cool and complex rhythmic patterns. I rarely find use for it on a vocal, but it’s still worth checking out if you want a little web of echoed signals behind the vocal.
A final tip from me here is that if you have a tape delay like Logic’s appropriately named Tape Delay, play around with the flutter rate and intensity to create crunchy, degraded delays that can be very cool in a harder-edged mix.
And last but not least – mix the two: Reverbs and delays can go very well together, and when you mix them you often need very little of each. Together they can create a great spatial effect that is harder to pinpoint than just a reverb or just a delay effect. An effect that is felt more than actually heard. I think probably 8 out of 10 times I will use both delay and reverb sends on a lead vocal.
When you are working on a whole mix, it can be good to automate these sends, because a dynamic use of reverbs and delays can really bring a vocal to life. Add a little extra reverb to a word you want to accentuate in a verse, or pump up the delays at the end of the chorus for dramatic effect. Few professional mixers will have static levels on their vocal effects sends.
Pitch
Here’s a troublesome subject. Ever since the advent of auto-tune, we have become accustomed to ever more perfectly pitched vocals in commercial productions. In my ears it sounds very artificial when I can hear that pitch correction has ironed out every kink in the vocal performance. I find it to be a very unsettling and unnatural sound. It’s important to keep in mind that a very large part of the expressive repertoir of a singer comes from pitch variations. A good singer uses vibrato, slides and minor pitch wobbles to express a wide array of emotions in music. And the human voice is never 100% on pitch all the time. There are minute variations throughout even the best vocal performance, that add to the aliveness and humanity of the performance. To remove too much of these variations, both natural variations and calculated ones, is to basically suck the blood out of the performance, in my opinion. I can’t tell other people what to do – maybe you happen to like hyper-perfect vocals. So I can only speak for me: I hardly ever use pitch correction on a lead vocal. I do two things instead: I find a good singer, and I make sure that good singer delivers a good performance. Problem pretty much solved.
However, there can be times when even the best singer flubs the occasional note, and remedying that can be helpful with some sort of pitch tool. I try to steer clear of even that, but I understand that it can have its uses. However, on backing vocals I am less principled about it. Recording backing vocals can be time-consuming, and if you don’t get all the takes perfectly, it can be ok to help out with pitch correction since these parts will not be exposed like the lead vocal, and are not primarily expressive but rather chordal elements in the mix.
A trick that can sometimes be cool if you have some sort of auto-tune plugin, but that doesn’t really have that much to do with pitch correction, is to send a dry lead vocal to an effects channel with auto-tune on it. Set the auto-tune to a fairly severe setting, and carefully mix the super-tuned signal in behind the un-pitched vocal. Voila, a cool doubling effect.
Automation/levels
A few words on automation of levels. I find that it is crucial to pay a lot of attention to volume automation on a vocal. To keep intelligibility constant you need to keep the levels dynamic to match the ebb and flow of the music. When a chorus explodes, don’t let the vocal be outshone by the band accompaniment. And conversely, bring the levels down when the arrangement is brought down. In a complex arrangement there might be places where I set levels individually for each word or syllable to make sure the vocal is not lost and keeps a perceived steady level compared to the accompaniment.
Editing vocal takes
Another few words on that tedious task: Editing. I will assume that you have already done the basic choosing and editing before the mix. But it can be a good thing to go through the vocal takes again, cutting out coughs, sighs, throat-clearings and other unwanted noises. It can be easy to forget once the whole band bangs away, but unwanted noises can still clutter the mix. I’m not a fan of noise-gating vocals, so I prefer to edit manually.
And at last: Backing vocals
Before I end, just a few words on harmony or back-up vocals. Most of the rules and advice mentioned here applies both to lead and backing vocals, but there are a few things that apply mainly to backing vocals: First, backing vocals can be more drastically filtered than lead vocals. A dense arrangement of backing harmonies needs to be quite severly high-passed if it is to be heard above a busy mix without cluttering neither the accompaniment or the lead vocal. It’s also good to pay attention to frequency overlap if you want the backing vocals and the lead to sound distinct from each other. An easy way of dealing with backing vocals is sending all the individual voices to one stereo track where you can batch-apply processing. Backing vocals can also stand more severe compression techniques – sometimes it’s really necessary – and even reverb can sometimes be applied more generously here. Sometimes I might even apply a little modulation effect, like an ensemble chorus, if I want a sort of ethereal wall of sound for the backing vocals. And mind the panning. For a lush, polished backing vocal sound you can pan the voices quite widely.
I publish these posts in a pretty random order. If you’re making an album, chances are you’re not starting out with bass and vocals. But I wanted to talk about vocals now.
If you’re producing rock or pop, I’d say the human voice is the single most important element in the mix – it is the one “instrument” that most immediately and efficiently communicates with the listener and evokes emotions. And even though it takes time, care and love to record vocals properly and to make them sound their best in the mix, it’s not an insurmountable task to get a good vocal sound.
The first thing you need is a singer. Maybe you sing yourself, or maybe you have outsourced the job to someone more honey-voiced than yourself. If you choose the latter option, keep in mind that a little psychology can go a long way to getting the results you want.
Freud in the studio
I’ve had the good fortune to work with a lot of singers. Everything from bachelorette parties wanting to record Britney Spears while they pop champagne, to super serious and seasoned Top 40 artists. Every single time I’ve had to use some social skills and some basic psychology to get it right. Why? Because singing is a very intimate act. When you sing you make yourself very vulnerable, because you are quite literally bringing something out from deep inside yourself. When a singer opens his or her mouth in front of the microphone in my studio for the first time, they might as well have stripped naked. It’s that vulnerable.
So my first rule when recording vocals is to ALWAYS listen to the singer’s wishes. Whatever he or she wants, goes. It’s their voice, their performance, and I want them to feel as comfortable and respected as possible. In the retail business the customer is always right. In the studio the singer is always right. If their voice or the accompaniment doesn’t sound right in their headphones – and even if it sounds perfect in yours – fix it. Keep at it until their listening situation is perfect for them. If you tweak and tweak and their headphone mix still isn’t right, give them a different pair of headphones. Maybe the contrast in sound will do the trick. If they want more reverb even after you dialed it to 11 – dial it to 13. You want them to feel as good about the situation as they possibly can.
Another important factor is patience. If they take some time to warm up and find their footing, don’t stress them. Be cool, act like you have all the time in the world. (One of the definitive perks of being a home recordist is that you actually DO have all the time in the world – you’re not on the clock.)
And when he or she starts singing: Get a feel for how confident they are. If you’re dealing with a confident and experienced singer they can usually take pretty concise coaching – chances are if they sing a bit flat they’ll be the first to point it out and ask for another take. And if they don’t, you can politely point it out to them. But if you feel that you are dealing with a nervous and inexperienced singer, telling them they’re out of tune is a very bad idea. The only thing you’ll achieve is that the next take will be twice as flat, or sharp. Be encouraging and positive. If you feel another take is needed, say something like “that was good, let’s do another take while you’re in the groove”. Also, if you’re dealing with a pitch-challenged singer it’s always a good idea to have them take the headphones off on one ear, so they hear their voice directly in the room. A lot of singers have a hard time hitting the pitch if they’re only hearing themselves back over the ‘phones.
Another thing that touches a bit on psychology is getting expression out of your singer. In my experience vocals are a bit like theater – whatever you want to convey, you need to exaggerate a bit to have it come across to the audience. A studio recording is very different from a live experience, where you see the singer’s face and facial expression, and where the atmosphere of the song is underlined by lighting effects and such. On an album all you get is the sound of the singer, filtered through a lot of technical equipment. Also, most listeners won’t have a lyric sheet in front of them, so the singer needs to really project the meaning of the song into that microphone. When I think of really great singers, they all have in common that they are extremely expressive – whether it’s Adele, Peter Gabriel or Robert Plant. They all tell stories and paint pictures with their voice. For proof of just how much expression a good singer puts into a performance, listen to this amazing clip:
I don’t mean that the singer should go all Celine Dion in your studio. Nothing is worse than huge gestures and over-the-top pathos. But I mean that whatever the song is supposed to make the listener feel, the singer has to really, really feel it when he or she sings, and convey it as strongly as they can muster – stronger than they might intuitively feel is necessary. Use the full range of vocal expression, from the whisper to the cry, if you have to. So if I’m recording vocals for one of my own songs, I often talk to the singer about what I want the song to communicate, and if I record the singer’s own music, I’ll ask them to reflect on what they want to convey.
And finally, even though I said be patient; know when to put your foot down. In my experience, and in the experience of everyone I know who records music, the best takes always come first. If the singer does take after take after take – call it a day. It won’t get better – on the contrary. Either you’ll have the gem you’re looking for somewhere among the first 3-5 takes – or you’ll start afresh tomorrow and get it right then. Don’t waste time and strain the singer’s voice.
The microphone
The first thing you need is a good vocal microphone. As I mentioned in my first post there’s a lot of good condenser microphones on the market these days. And a condenser is usually what you want, although a dynamic one like a Shure SM58 can also do a good job. But you’ll get a fuller sound out of a condenser. I’m not going to get into a lot of brand names and recommendations – you can find a good guide here: http://www.musicradar.com/tuition/tech/21-microphones-for-recording-vocals-446655/19
Brands like Blue, Violet, MXL and SE Electronics all provide very high quality condenser microphones for relatively low prices. One brand I am not so happy with, but that is often recommended by sales people, is Rode, which I tend to find a bit dull. You want a microphone that gives a full sound, and that captures the top end with some degree of fidelity. A dull microphone will give you vocals that you have to tweak a lot afterwards, adding extra top with eq and such. The more you have to tweak the vocals after recording, the less natural they will sound. Your aim is always to get as natural and full a sound as possible, one that needs little eq tweaking in the mix.
I am fortunate enough to own a 50s Neumann microphone. It’s the most expensive piece of gear in my studio, and the best investment I ever made. A vintage Neumann is the kind of microphone that flatters pretty much any sound source, for reasons that remain a bit mysterious to me. Everyone who records vocals knows that it is very rare that you don’t have to apply ANY eq to a vocal. But with my Neumann that actually happens quite often. Here’s an example of a lead vocal I recorded where the only treatment is some reverb and delay. Apart from mild compression from the recording channel, nothing is done here – absolutely no eq, no de-essing and no post-recording compression.
That microphone also works great on pretty much anything else as well – it’s wonderful for both acoustic and electric guitar, woodwind, percussion – the list goes on. What I’m trying to say is that a good condenser microphone is the one place where you might actually want to put down a little cash. A good Neumann-style valve condenser from MXL is about 200-300$ – that might be a good long-term goal for your piggy bank.
The room
In vocal recordings, acoustics play a part too. Chances are you have a room that’s not exactly ideally designed for acoustics. I wouldn’t necessarily recommend that you go out and spend tons of money on acoustic treatment. A couple of simple measures will go a long way:
Number one is ridiculously simple – place your singer with his or her back against the wall. That way the microphone will mostly pick up the voice and very little of the acoustic reflections flying off the walls of the room. Additionally it helps to place the singer fairly close to the microphone. I talked about the proximity effect in my bass guitar post. Too close will give you a bassy, boomy sound. But too far away will give you too much of the room sound, which we will assume is not a great sound. Experiment with distance to the microphone. It also depends a little bit on the style. If the vocals are supposed to be soft and intimate, the singer can get quite up close and personal with the mic. If it’s more of a rockin’ out kind of vocal style you’ll want a little distance.
Very bare walls reflect more sound, so if you have some of those, maybe just prop a mattress up againt the wall or something. Every little thing helps.
It’s more helpful than you’d think when it comes to shielding the vocal recording from reflections.
Another thing that I find indispensable is a pop filter. It’ll save you trying to edit out plosives and pops in the mix.
Pressing rec
Once the singer actually starts singing, and you start recording (make sure he or she has warmed up properly first), there’s a few helpful methods that will keep you organized and get good results.
Firstful: Check your levels. Get the singer to belt it out as much as he or she will in this particular song and then some. Set the recording level so that that doesn’t clip – but not too much below it. That way you’ll have a decently strong level while ensuring that the recordings won’t clip even at the loudest parts. Another thing: If your audio interface or your preamp has a hi-pass filter, engage it. It’ll typically have a fixed cut-off point around 90 hz, which is going to filter out any low rumblings from when the singer bumps into the mic stand or whatever. Also, if you’re lucky enough to have a recording channel, just like I said with the bass guitar – throw on some mild compression to tame the signal.
Secondly – don’t let the takes pile up. I hate ending up with a screen full of takes. They’re hard to keep track of, and create chaos when you’re done recording. My approach is to listen very keenly to every take, and to delete, as you go along, the ones that don’t add anything useful or that are simply flubbed. Ideally I want to end up with as few takes as possible – maybe as little as 5. Then when we’re done with that particular part of the song, the singer and I will go through those 5, and single out the best take. That take will be the master, the guide. Then we’ll weed out the least good among the rest, and delete those. I want to be left with only 2 or 3 takes.
Here’s why: There’s this thing called comping, very popular with a lot of engineers, but I friggin’ hate it. Comping is when you get a gazillion takes, and from those takes you get a sensuous slide from this one, a cool word from that one, a breathy phrase from another and that awesome squeal from take 73. I used to be subjected to engineers going through this process back in the day, and it drove both me and the singers crazy. So no more comping in MY studio – ever. A comp’ed vocal will very often give you a perfect but sort of disjointed and detached sound, and it is more work than any sane person would want to put themselves through.
So I want as complete and continuous a take as possibly. Preferably I simply want one whole take with no splicing going on at all. But once you single out that one heavenly take you’ll still want to hold on to one or two good takes in addition, in case there is a word that didn’t quite come across strongly enough or a pitch wobble that detracts from the whole vocal. Then just edit in those bits from the extra takes you have. Sometimes I’ll also keep an extra take in case I want to double parts of the vocals or the whole line.
The point of getting as full a take as possible is for the sake of continuity. No take is ever the same, and each one will have a distinct flow and atmosphere. Once you start dividing up takes and combining them – you lose the flow. Also, that search for the ideal, perfect take that drives engineers to comp seems misguided to me. An inhumanly perfect verse or chorus is a way of tricking the listener – you’re asking them to suspend disbelief and think that a mere human could’ve done all those acrobatics without a single misaligned note. Audiences don’t fall for that. The vocal is the human element in a rock mix – and it needs to be just that: Human. Not perfect.
Here’s another little trick that I like to use when recording vocals. I’ll ask the singer to run through the verse or chorus or whatever and just do some crazy, improvised stuff, or variations on what they already did. I’ll keep those takes seperately from the main takes, and use them as spice when I mix. Maybe add in some ghostly whispers to a moody verse, or maybe I’ll have some wild whoops or nice counter melodies to liven up a chorus. So that’s my spice rack.
Harmony
The last thing I want to talk about in this first part on vocals is harmony. I’m no music theorist, and I’m not going to tell you how to construct harmonies. You know best what it takes. I do know that there’s a lot of advice out there that mostly strikes me as stupid. “Avoid parallell fifths”… uh, have you ever heard folk music? Or goth… When it comes to harmony the best thing is to throw out the rule book and follow the ear and the heart. Listen to Ligetï, and you’ll realize there are no boundaries for what is possible in terms of building harmonies. And listen to Joni Mitchell to see how great an experimental approach to vocal harmonies can be even in a pop setting.
Still, there are some basic ideas that can be helpful. Parallell harmonies, for instance, can be very effective but can get a bit one-dimensional if used all the time. A good way of bringing life and movement to a melody is by harmonizing in the opposite direction of the melody. If the melody rises, let the harmony descend, for instance. And even cooler, try some simple counterpoint, where the harmony is not following the melody at all but providing its own counter-melody while still creating pleasant harmonies where the two meet. And another thing – avoid unison in harmony lines. If the harmony line hits the same note as the main melody, it will feel as if there’s a hole or a drop-out there.
When it comes to recording harmony, I like to dub harmony parts, meaning that for every harmony voice, I’ll record a second identical take before going on to a new voice. That way you can pan the doubled harmonies out across the stereo spectrum and get a rich, lush sound. For even more lush-tastic sound, dub the harmony line, then do it again, an octave up or down. You know those luscious harmonies you’ll hear in 70s and 80s arena rock? That’s how you do it.
That’s it for now – the second part will deal with mixing the vocals.
OK, so it’s time to get our hands dirty and actually talk about recording and mixing to get the great results we want. I considered starting with a general post about recording techniques and such, but I decided against it. Either I’ll do that later or you already know it. Let’s just get down to the music making.
I want to start with the second most difficult instrument to mix – but thankfully a simple instrument to record: The bass guitar.
The bass is a surprisingly complicated instrument, in spite of its meager 4 strings and relatively limited range. There are many reasons for the complications that ensue when mixing bass. One is that the bass guitar can be so many different things. There’s no established way for the bass to sound, it’s extremely context dependent.
Just off the top of my head I can think of a few very different bass sounds that are all valid and relevant: The trebly, present and aggressive bass guitar from players like John Entwistle, Chris Squire and Geddy Lee. The deep down, recessed, holdin’-it-all-together bass of Marcus Miller or Chuck Rainey, also a style found on a lot of Steely Dan and West Coast albums. The rocky, I’ve-got-a-pick-and-I-mean-to-use-it approach used by metal bassists and also beloved by punk bassists. The bouncy, lightweight sound of a million 80s pop albums. And let’s not forget the funk bass – or the Motown bass… the list goes on.
Here’s a few examples of great, distinctive, but very different bass guitar sounds, just to give you an idea:
One of the greatest bass players – and one of the greatest sounds – I know of is the amazing Chris Squire. Note the considerable amount of treble, and the way the bass guitar stays well clear of the kick drum. You’ll also notice that the bass has a particular “growl” that really helps it cut through the mix.
And here’s a great example of the West Coast bass guitar – almost diametrically opposite to Chris Squire’s approach. I think it’s Chuck Rainey playing on this Steely Dan track. The bass is super deep, quite minimalistic, and really doesn’t draw attention to itself. But boy does it get the job done!
Here’s a typical, but also very luscious-sounding example of the 80s pop bass, from Bryan Ferry’s “Boys and Girls” album. The album is filled with great bass players, I’m not sure which of them plays here – it might be Tony Levin. The bass is neither particularly deep nor particularly trebly, it stays more in the middle of things and is as much about propulsion as it is about the actual notes being played. There might be a bit of chorus on there too, very typical of the time, and another technique that can help the bass “sit well” in the mix. (Although in 2014 any self-respecting bassist would probably throw you a punch if you tried to slap chorus on their bass.)
Another factor that complicates bass mixing is that bass frequencies are inherently difficult to work with. Strange things happen in the deeper recesses of the frequency spectrum, and to add insult to injury the human ear isn’t very good at hearing bass sounds. Our ear is most sensitive to high frequencies, which means that a typical rock mix, where the bottom end is so important, must compensate for our ears’ low bass sensitivity by pumping up the bass frequencies. That’s why the eq curve of a typical rock or pop song will always look like a slope or a hillside, with the peak to the left, where the bass is:
That’s just a few of the factors making the bass a mixer’s nightmare. But there’s more! The bass has the unenviable role of having to compete with two of the most prominent instruments in rock music: The kick drum and the guitar. The kick operates in pretty much exactly the same frequency range as the heartland of the bass guitar, while the lower parts of the guitar’s range clash with the upper range of the bass guitar. There’s a whole range of philosophies that have been dreamed up to deal with these problems.
First, there’s the two approaches to mixing a bass with a kick drum. Put simply, you have to choose which one should be on top. Kinky, isn’t it? If the bass plays a supporting role, with restrained playing and low notes, the general advice is to tuck it under the kick drum, frequency wise. Practically, this might mean giving the kick a boost around 100 hz, while you boost the bass guitar slightly below that point. Or even better, you can notch out a space for the bass in the kick’s eq. But I’ll get back to that. If on the other hand you’re dealing with a wannabe Geddy Lee, all treble and attitude, you’ll want to do the opposite – carve a space for the bass on top of the kick, and let the kick do the bottom pumping.
As for the competition with the guitar, the best thing is to put a hi-pass filter on any guitars that stray into bass territory. You rarely need the guitar in a busy mix to dip under 100-150 hz, maybe you can cut it as far up as 200 hz.
Enough of the technicalities. Let’s record.
I am going to assume that you have a decent instrument. The bass guitar is not one of those instruments where you HAVE to have the most expensive, classic gear available. A great bass guitar is great, but a decent one will do fine if it is set up right. Make sure the string action is right, so you don’t get any ugly slapping sounds from strings hitting the fretboard, and make sure the intonation is right – this last thing is super important. I’ve been lazy with intonation a few times and regretted it.
You can record a bass guitar with or without an amp – it’s one of the blessings of the instrument. DI-ing a bass guitar can give great results, especially if you have a good amp simulator in your plug-in toolbox. But even without one, a DI-d bass can be awesome. If you are DI-ing, you can, as I have mentioned earlier, plug it straight into the soundcard. But be VERY aware of levels. A bass guitar clips easily, and if it clips, there’s nothing you can do to “fix it in the mix”. So watch your levels, and you’ll get a good result.
If you have a recording channel or a preamp, you’re extra lucky. With a preamp you can add a little grit to the bass on its way into the soundcard, the kind of mild saturation that helps the bass cut through in the mix. And if you have a recording channel with a compressor, even better. Activate some mild compression and you don’t have to worry so much about clipping, plus you’ll get a more controlled and even bass sound.
That said, it’s great to use an amp too. I have to admit that I really don’t know the first thing about bass amps, except I know when I hear a good one. If you’re a bass player you’ll know what you need to know. My favorite approach when it comes to bass recording is to do both: Plug the bass into an amp, but also run a cable into a preamp/soundcard for the DI sound. Most amps will have a dedicated DI output. That way you get the best of both worlds, and if you’re unhappy with one sound, you’ll still have the other. Personally I like to mix the two signals. The amp signal can be great for attitude, grit and a sharp top end. But amps can get a bit flabby in the bottom, which is where the DI-d signal comes in handy – it will have a full and focused bottom end.
When it comes to miking the amp, you have many options. The important part is to use a mic that can handle low frequencies. You CAN record a bass guitar with an SM57 – especially if you have a DI-d signal to provide the deep end – but the SM57 in itself doesn’t really provide much actual bass. I used the SM57 plus DI approach on my band White Willow’s 2011 album Terminal Twilight, which worked great because I mostly went for a slightly distorted, growly bass sound.
But if you want a deeper, fuller bass sound, I personally think that nothing beats the Sennheiser MD 421.
This workhorse is a great investment, as it is also perfect for electric guitar, brass instruments, kick drum and even vocals. On the bass, it captures everything you need. Play around with placement in front of the amp until you find a sweet spot. And beware of the proximity effect. The closer it is to the amp, the more bass it picks up. This can be a little tricky in a home studio that is probably not acoustically optimized. You don’t want too much of the room sound, so you want to close-mic, but you also don’t want a completely boomy sound. Experiment.
A few words on the actual bass playing before I move on to mixing the instrument. One of the main keys to getting a great bass guitar sound is actually the way the instrument is played. One thing that I personally can never remind myself of enough times, is to remember when NOT to play. The space between the notes is just as important as the notes, and on a bass guitar that has such a dominating sound, it is also important to remember when to dampen or cut notes. Don’t let every bass note ring to eternity – it’ll clutter the mix needlessly. It’s always tempting to get a lot of sustain out of an instrument, and sometimes it’s cool, but on the bass it’s sometimes even cooler to do the opposite. Listen to this, for example:
That bass is seriously lacking in sustain, but ironically it doesn’t detract from the instrument’s power or presence in the mix, on the contrary: The space between the notes makes the bass guitar stand out even more.
Now for the mix.
One of the most important lessons to learn when mixing bass is that less is pretty much always more. I love a powerful bass guitar in a mix, and I always like mixes where the bass is pushed to the fore. Intuitively, then, if you’re like me, you might start by boosting the bass’… bass. But don’t. If the bass has been recorded properly, chances are it has all the bass presence it needs and then some.
Adding more bass to a bass guitar in a mix will actually make it sound weaker most of the time. It will make the bottom end of the whole mix murky, it might make the bass guitar boomy which is never desirable, and it will certainly mask the kick drum and consequently rob your track of pretty much all its power.
In fact, one of the first things I will do when mixing a bass guitar, is to remove some bass at the very bottom. I usually filter out the bottom end up to 30 or 40 hz, because there’s almost always some sort of sub bass rumbling there that will steal power from the meat of the bass sound.
Beyond that, it’s a listening game. How does the untreated bass guitar sit in the mix? Is it too dominating, too weak? And if you’re using both the amped and the DI-d signal, how do they sit together? I will usually notch the two signals so they compliment and don’t overlap too much. I usually let the DI bass do the lowest talking, while the amped signal provides the rock’n’roll edge of the sound. This might mean filtering the amped signal quite a bit higher up, maybe as far up as 90 hz, to leave room for the bottom warmth of the DI bass. Or you might find that a bit of a combination of the bottom end of both signals gives a nice, focused sound.
One thing to remember when combining signals is to check for phase errors. Sometimes you’ll get a flipped waveform on one of the tracks, and if this lines up perfectly with the other track they’ll actually cancel each other out. Invert any flipped signal, and THEN make sure the two waveforms line up perfectly, to avoid chorusing effects and an unfocused sound.
Next you might want to see how the bass sits with the kick. Like I said earlier, the two need to stay out of each others’ way. If the bass is supposed to lay low, you may want to look at its eq curve and see where its peak is. Then go to the kick’s eq and notch out a bit in the area where the bass peaked. Listen and see if you hear a difference. It’s a bit like a sculptor’s work, you chip away at those eqs until you have two “forms” that sit well together. But don’t overdo it. We’ll assume that you have pretty good sounds to begin with, and heavy-handed eq will reduce the quality of those sounds. Be gentle. And don’t get all visual. The curves are a guide, but your ears are the judge. When you have a sound where the kick cuts through and punches where it matters, and the bass is not masked by the kick, you’re halfway there.
The actual sound of the bass is, as I showed earlier, highly dependent on the context. High, low, smooth, crunchy. Anything goes. But you want to make sure of a few things regardless. Tonal integrity is one. The actual tonal meat of the bass is of paramount importance. The bass guitar is a very important guide to the listener’s understanding of the harmonic content of the music. One single bass note can completely re-contextualize a guitar chord, for instance. So it is extremely important that the actual notes played by the bass are audible. This is a grievance I sometimes have with modern metal recordings, where the bass is little more than a rumble in the deep abyss of the mix. We must hear the notes! So make sure we do.
Another thing is the bass’ presence. The bass gets easily lost in a mix if it doesn’t have some top end that helps it cut through. So don’t be shy with adding treble if there’s not enough of it in the original sound. As long as it doesn’t get harsh or clangy, the bass mix can handle a lot of treble. Just listen to Geddy:
Geddy Lee’s bass also demonstrates that presence isn’t just in the treble. He also has that great growl that resides somewhere in the mids of the sound. Again, experiment. And of course his bass is slightly distorted, which is the final and maybe most effective way of making the bass cut through. The bass can handle a lot of distortion. It might not sound pretty in isolation, but bring in the whole mix around a fuzzed out bass, and you’ll hear just how great it can be.
You also have to watch the lowest frequencies. This is a mistake I hear in a lot of amateur mixes, and one I’ve made myself many times. If you hear booming or masking, or just feel that the mix is somehow congested in the bottom, chances are the bass is to blame. Get out your eq, and try to cut very carefully – sometimes a notch in the 60-100 hz area will do – but be careful not to cut out any actual bass fundamentals – and sometimes a wide but gentle cut in the 150-250 hz area will bring some much needed air into the mix. You’ll also sometimes find that you don’t need all that much of the instrument in the area around 500 hz. The bass can usually stand a bit of slimming. But you still need to make sure that you maintain a real sense of body in the bottom. The warm, trouser-flapping oomph of the bass guitar is situated in the 40-60 hz area, which is an area that budget speakers don’t always represent all that well. Bring out the headphones.
Then there’s compression. The bass guitar is a compressor-friendly instrument. I hardly ever NOT compress a bass guitar. Because of the power of its frequencies, you want to make sure that the bass plays evenly, without notes jumping out in certain places. And you also want to make sure all the notes are heard all the time. I don’t really have any recipe for compressing the bass, it’s another area to experiment with. But don’t go overboard. Heavy-handed compression can kill the bass’ power and also trip up the pulsating heartbeat that the bass player hopefully communicates through his/her use of dynamics. You don’t want a squeezed bass sound, you just want one that plays evenly and holds its own in the mix. I personally find that vintage, analog-style compressors work best with the bass because they also add a little warmth and grit that can be beneficial to the bottom end of the bass.
When it comes to other effects, I’d generally be careful. Modulation effects (80s chorused bass notwithstanding) can do more harm than good because they can cause frequency fluctuations that really destabilize the bass image in the mix. Delay can be a cool effect in isolated places (think Pink Floyd’s The Wall) but will absolutely mess up the mix if used throughout. And reverb is mostly a no-go. BUT – here’s a secret little trick that I have, and that I am almost hesitant to share with everyone – but I will: A tiny amount of spring reverb on a bass guitar can have an absolutely magical effect. It can really settle the bass into a mix in ways that can not be achieved in other ways. Just a bit, and preferably a dark, unobtrusive kind of spring reverb.
Beyond that there is nothing more to say than put your bass in the center of the mix unless you’re mixing psychedelia. A panned out bass can make the mix feel very lop-sided. Best of luck!
In the first post I started talking about the basic equipment you need to make great sound. I started with the beginning and the end; the microphone and the monitors. Obviously you need a few steps in between those two, but as I said, I personally find that if you get the beginning and end right, you have to worry less about the middle.
The soundcard
Strictly speaking, you can plug the microphone directly into a soundcard. I did that on my first homebrewed album, and it sounded absolutely fine. All modern soundcards come with phantom power and such, so from a purely logical point of view you don’t need a pre-amp.
I find that almost all soundcards on the market today fulfill your basic recording needs. In the budget class they all sound pretty much the same, which I suspect is because the innards of all those units are basically identical. And when I say they sound the same, I should add that they sound very good. The quality of audio interfaces has really improved over the years. There’s really no point in asking the sales guy “which interface sounds best?”. I’m sure he’ll give you an answer, but it’ll be BS, because within a given price bracket, there is no difference in sound quality.
So what should you look for, if all budget soundcards are created equal? In one word: Functionality. The key here is simply, what do you need your soundcard to do? Are you going to record your band live? If so, you need enough inputs. Do you want to hook the interface up to some sort of multi-track recorder – if so you need enough outputs, and outputs of the right kind, whatever that may be. Are you going to hook it up to outboard effects units? Then you need some sort of send/return functionality. Midi? In, out or both? Headphone outputs – do you need extra outputs for the musicians, and dedicated headphone controls? And one thing I personally find very important: Metering. That was probably the main reason why I fell for a small, cheap soundcard from Akai a few years back called the EIE Pro, which has beautiful, old-fashioned voltmeters that really tell you what’s going on. So, little things like that can make or break the deal.
When it comes to the technicalities of conversion, I’m a bit of a skeptic when it comes to stuff like 24/192 recording. I’m a 24/96 guy myself, and I was happy working in the old 16/44, although I do hear a difference. But at higher bit depths than 96 all you do is take up a lot of disc space with NO discernible difference in audio quality. So as far as I’m concerned, that’s an option I don’t need. Kind of like 5.1 – but I’ll rant about that another time.
The DAW
Of course you’ll need something to record into, and to edit and mix on. I wouldn’t recommend one of those portastudio things. Go for a DAW – it’s the industry standard, and it’s so much easier to work with when you want to get in deep with the editing and such. Like with the soundcards, I pretty much think that all DAWs also are created equal in terms of audio quality. They all run audio engines with similar or identical architecture.
So the deciding factor is price, functionality and proliferation. I mention that last thing because if you are going to work with other musicians, or other engineers for that matter, it’s kind of sucky to work on a platform that no-one else has. I’m sure the Record-o-Matic WonderMachine that was a free download from U-2-Kan-Make-Rekkids.com has all the bells and whistles and sounds Wonder-tastic, but I wouldn’t want to handle a project exported from it. The most common DAWs are Pro Tools, Logic (which I use), Cubase, Sonar and Ableton, to name some. Go with one of the big names, and find one with a workflow you like, and you’ll be happy. And these days they all come at reasonable prices, especially if you go with the entry level versions.
Plug-ins
I like plug-ins! You’ll hear a lot of snobbery among old school mix engineers who sneer at the digital emulation of classic outboard equipment. It’s not the same, they say. Nothing can beat the real thing! It sounds cold, fake, hollow, or certainly not right anyway in some kind of way… Well, they can suck on their dusty, short-circuiting 1176-es! I don’t think there’s anything wrong with mixing “in the box”, and I don’t think ANYone today would be able to tell the difference between a mix done with actual outboard and one done with plug-ins. The quality is great these days, and as with anything, it’s all in how you use it. Plus, an 1176 emulation never fails and doesn’t need maintenance. And sounds just as good on a Monday as on a Friday!
In all seriousness, plug-ins provide the toolbox for an “in the box” engineer. Even though all DAWs provide perfectly useable and sometimes brilliant plug-ins that cover all kinds of needs, from compression via eq to modulation, reverbs, pitch correction and what-not, it might be wise to invest in a few, choice pieces of exclusive stuff. I personally gravitate towards Waves‘ products. They are in a class of their own, only matched by UAD’s stuff (but for that you need dedicated hardware, so it gets a bit more complicated).
There are a few indispensable things from Waves I’d like to recommend, and they don’t even pay me for it! Their Renaissance compressors are fantastic. They’ve been around a long time, but they really get the job done. Renaissance Vox for vocal compression is one of the best on the market, and I really like Renaissance Axx for guitar needs. Any EQ from Waves is also good. My guess is that your DAW has a decent parametric equalizer which is good for precision eq. But get yourself some sort of emulation of a classic EQ as well, for the broader strokes that really create a vibe. I find that a good emulation of a Pultec EQ is indispensable, especially for drum mixing. And an emulation based on the Neve 1073 eq will be really good for adding air and sparkle. Stillwell has a really good one that comes at an incredibly reasonable price – and you can evaluate it at your leisure for free.
And of course no studio, even one in the box, is complete without at least one classic compressor. So we’re back to the 1176. You gotta have it. For drums, for vocals, for anything. I love my Waves version, but here’s a hot tip: Stillwell’s “The Rocket” is also an 1176 emulation, albeit undercover, and it sounds amazing.
I’m sure I’ll come back to favorite plug-ins in future instalments, but that’s it for now. Next time I’ll start actually talking about making sound. Let me know what you think and what you want to hear about!
I decided to create this blog because in spite of the plethora of recording advice out there, both in books and on the internet, there isn’t that much stuff that is useful for those of you who have real ambitions of creating professional sounding recordings but don’t have the budget to enter a “real” studio or use seasoned engineers.
Most of the recording advice out there tends to fall into two categories.
1. The seasoned pro perspective: “I know what the fuck I’m talking about and I’m telling you, if you don’t have a 96 channel Neve console and 5 racks of Pultecs, you can’t make great sound”,
or 2. The happy amateur perspective: “I got this plugin bundle for 5$ and a mixer from Behringer and I SWEAR my mixes sound just like Pharrell Williams'”.
So, I want to put a little nuance into this picture and show that you can be genuinely concerned with audio quality without owning a Neve – and still get great results.
Who am I? A nobody really, or almost. I’ve been making albums since 1995, mostly within the genre of progressive rock or art rock. I have two bands where I am the songwriter/producer/guitarist: White Willow and The Opium Cartel. I have also worked on many other albums, both as a producer, mix engineer and session musician.
In the beginning I recorded my own bands’ albums in “professional studios”, back when we were on a label that gave us actual recording budgets. I learnt a lot from that, and quickly found out that the art of recording was at least as fascinating and attractive to me as the art of making music.
A few years down the line I decided to create my own label with my collegue Lars Fredrik Frøislie, Termo Records. We are not a moneyed label, so we have been following a different concept. We self-produce and record our albums in our own little music dens. So over the last few years I have used everything I learnt during my time working around professional engineers to create as convincing and rich-sounding recordings as possible using only the barest minimum of equipment and money.
Apparently it’s working. Every album I have recorded in my own little studio has been unanimously praised for their audio quality – even by reviewers who didn’t like the music. I’m not making any claims to be a great engineer – I’m still just an amateur with a bit of luck on my side. And I still make a million mistakes. And there are lots of amateur engineers out there that are better than me – including my label partner Lars. But I have learnt a ton during my time as a “home engineer”, and I have a bit of a geeky obsession with anything that relates to sound, so I tend to philosophize a bit around these matters. So I thought I’d share some of my discoveries and insights, in the hope that it can help other musicians seize control over their music production.
Some technical notes. I started out with hardly any recording equipment at all. The first album I recorded completely on my own was made with a G4 Powerbook, the cheapest M-Audio soundcard I could find, a pair of KRK Rokit speakers – the smallest ones – and one microphone – a Lithuanian or Latvian or something deal that at the time was my biggest investment – it cost all of 150$. I couldn’t really afford plugins at the time, so I used the ones native to Apple’s Logic DAW. It all worked perfectly fine, and honestly, I’d still be happy making music with that setup. (I have progressed a bit since then, equipment-wise, but more on that later.)
So I guess I’ll talk a little bit about equipment needs in this first blog post.
My most important discovery when it comes to equipment, is that the beginning and the end is what counts. With the beginning and the end I mean what goes on at the sound source – the instrument and the microphone – and what goes on at the end of the signal path – your speakers, or monitors as they’re called when they’re in a studio. Anything in between those points is really a lot less important in my experience – although I am sure some folks out there would disagree. A nice preamp is nice, for sure, and a soundcard that doesn’t mangle the sound is pretty ok too. But if you have a good instrument, a good microphone and at least a decent pair of monitors, that’s really all you need to make great sound.
The great part is that even the microphone and the monitors don’t need to be expensive. For vocals, you can get shockingly great condenser microphones from China that give you clarity and smoothness without breaking the bank. And for anything else, seriously, all you need is a Shure SM57. That microphone is the greatest treasure known to the recording human. For electric guitar recordings I know of no better method than simply sticking one SM57 right in front of the speaker and just cranking out those power chords. A brand new SM57 will set you back 100$, a good second-hand one much less. And with a pop filter it’s a really great vocal microphone – or simply get the “vocalist version”, the SM58. It was good enough for The Killers’ Brandon Flowers.
So as long as you’re not recording a full-size drum kit (that’s a different story for another time), that’s really all you need in the mic department.
As for monitors, there are so many good ones out there now. I was really happy with my KRKs, but you’ll do just as well with Adam, Event or the smallest Dynaudios, or even cheaper ones from Fostex or M-Audio. What you want to be looking for, is a somewhat even frequency response. You’ll hear people talk about a flat response, but really there is no such thing, especially not in the budget class. And you don’t want that anyway – you want monitors that vibe a bit and give you a bit of inspiration and joy. Surgically precise monitors are boring to work with. The critical points to me when shopping budget monitors are:
1. The bass. Few budget speakers provide “real” bass, in the sense of sub bass or even a stable bass image. But that doesn’t mean you shouldn’t try to get the best you can. Here’s a tip: Record a sequence of bass notes, like an octave of bass notes with a sinus type synth sound. Play those back over the speakers in the store. How do they sound? Do some stick out like sore thumbs while others are barely audible? If so, pass. If you get an even playback volume on all the notes, you have a decent speaker. You might hear the volume dip on the lowest notes – that’s because few budget speakers maintain an even level below 40-50 hz. When you mix and you need to check bass levels below that, I would advise you to simply put on a pair of headphones – they’ll tell you what you need to know.
2. The high frequencies. Some budget speakers have a tinny top end that is caused by distortion in the highest frequencies. Again, you won’t get perfect, silky top end on a budget, but you should be able to get a pleasant, clear representation of the highest frequencies. Good reference material here is good vocal recordings, where you can pay attention to the top end of the voice – the breathy part, or music with well-recorded cymbals, or say an acoustic guitar recording with rich overtones. If that plays back with a full and pleasant and reasonably detailed sound, you have a winner.
I’m usually not so concerned about the mids in these kinds of speakers – the mids are usually decent to very good. But you should of course take in the full spectrum of sound when listening. Is the sound full-bodied, substantial, non-fatiguing, and is the stereo image wide and stable? Then go for it.
One thing NOT to do when monitor shopping, is listen to the advice of the salesman. He’s either ignorant about the whole thing or eager to sell whatever is this months’ slow seller. Trust your ears.
I think I’ll end it here, and continue with basic equipment needs in the next installment. Feel free to give feedback or requests for things for me to talk about.